

How to Install Expanded PTFE Tape
2023-04-21
How to Install Expanded PTFE Tape?
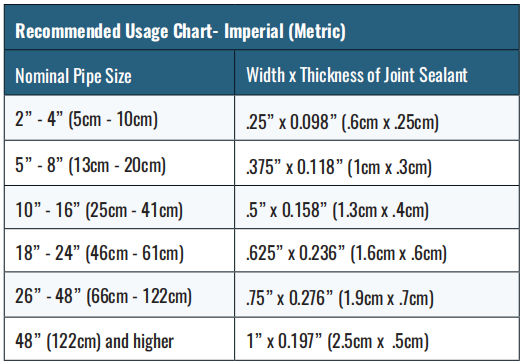
After reading this content you will know more about expanded ptfe tape and how to install it. Below are the steps of Installation Instructions.Size Selection
• For flanges with and without raised face, follow this chart to select the nominal width of expanded PTFE Joint Sealant tape required.
Step 1: Preparing The Flange
• Open the flange connection by a minimum of 6” (15cm).• Sealing surface should be cleaned of old sealing materials and checked for damage.
Step 2: Skive Cut Technique
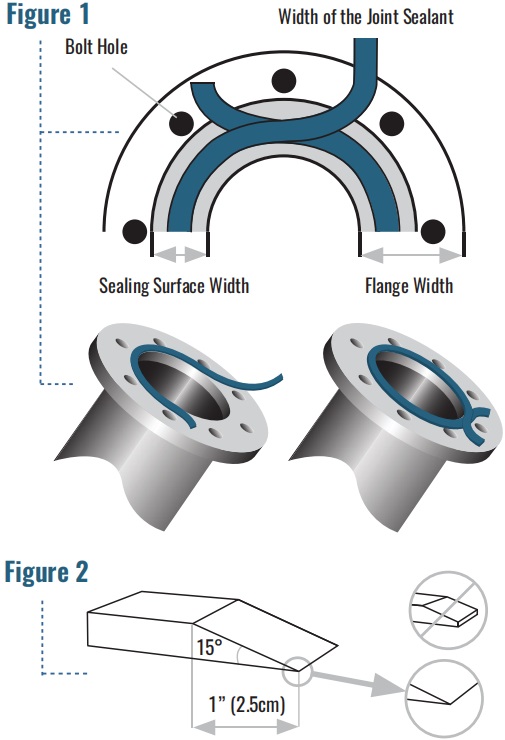
• Unwind enough of the Joint Sealant to reach around the circumference of the flange, plus excess to overlap (figure 1). Cut the end with a sharp knife by using the skive cut technique - length of the skive cut approx. 1” (2.5cm) at a 15° angle (Figure 2).
Step 3: Applying The Sealing Tape
• Remove the masking tape a little at a time to prevent the adhesive strip from picking up dirt. A dirty or damaged surface may cause a misplacement of the Joint Sealant during assembly.• Position the Joint Sealant as shown in Figure 1.
Step 4: Closing The Sealing Tape
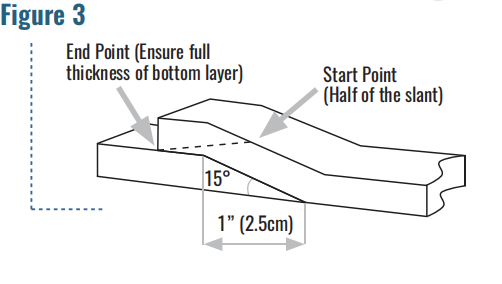
• Complete the installation by placing the Joint Sealant over the skived end and overlap approx ..5” (1.3cm) of the Joint Sealant (Figure 3).• For the second skive cut identify and mark the start and end points
Step 5: Remove Excess Material
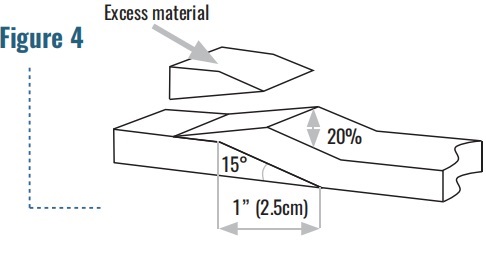
• Cut away excess material with an angle of 15 degrees. The interface should be 20% thicker than the original Joint Sealant (Figure 4).
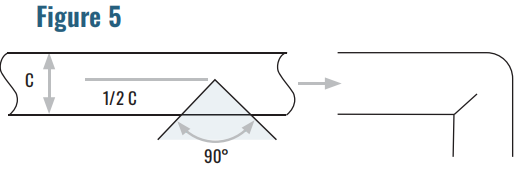
Rectangular Flanges
• Follow Steps 1 through 3.• Turn sharp corners: Perform a V-shaped cut (a 80° - 90° notch) at the inner edge of the tape (Figure 5) and ensure the outer half of the Joint Sealant is not affected.
• Bend the Joint Sealant around the corner. It is held in place by the adhesive backing.
• To close the Joint Sealant, follow Step 4.
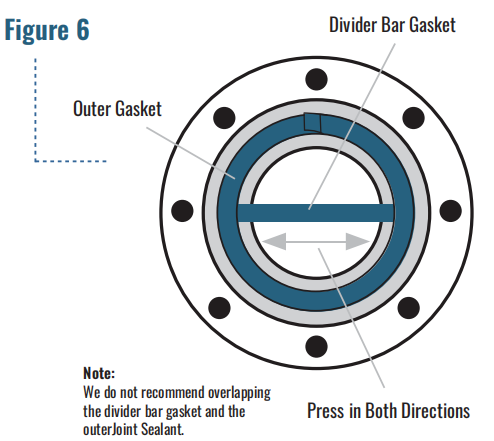
Divider Bar Gaskets in Heat Exchangers
• To install the outer gasket follow Steps 1 through 4.• To install the divider bar gasket: clean the sealing surface and cut the required length of the gasket tape by a 90° butt cut at both ends. Remove the masking tape and firmly press both ends of the divider bar gasket into the outer gasket (Figure 6).
Tongue and Groove Flanges
• Installation on the Tongue: Follow Steps 1 through 4.• Installation in the Groove: Follow Steps 1 through 3 in the groove.
• To complete the gasket, lay the last 12” (30cm) of the Joint Sealant in the groove and mark the position of the starting skive cut.
• Perform the second skive cut on a flat surface.
• To close the gasket remove the masking tape and lay the Joint Sealant in the groove in a way that the skived cuts overlap according to Figure 4
Previous:What is Expanded PTFE